Использование Тачпада от ноутбука
Вс май 23, 2021 17:57:50
Всем привет! Имеется несколько тачпадов от ноутбуков, хотелось бы их использовать в своих проектах. Все тачпады используют контроллеры Synaptics: T1006, T1007, SS2202A, и подобные. Интерфейс подключения - PS/2. В сети нашел несколько библиотек и примеров подключения. Но все дают только один и тот же функционал: передается направление перемещения мыши по "x" и "y" с определенным ускорением. Как это работает можно посмотреть в этом видео: https://www.youtube.com/watch?v=drMe4CBBxds
То есть не зависимо от положения мыши, не зависимо от положения пальца на тачпаде, передается только направление движения пальца-мыши, и с какой скоростью идет это движение.
В то же время тачпады имеют разметку функциональных кнопок и скролов. На фото ниже видно как тачпад от Тошибы имеет такую разметку.
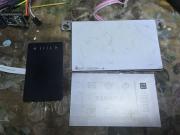
Это подразумевает что контроллеры Synaptics имеют возможность отслеживания не только направление и скорость перемещения, но и точное место прикосновения пальца к тачпаду. То есть, можно на тачпад нанести разметку собственных кнопок и сделать сенсорную клавиатуру... Но ни одна библиотека или пример не дают такой возможности. Только направление и скорость перемещения. Вот ссылка на архив с несколькими библиотеками:
https://drive.google.com/file/d/1SO5TpS ... sp=sharing
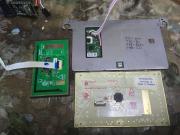
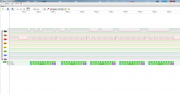
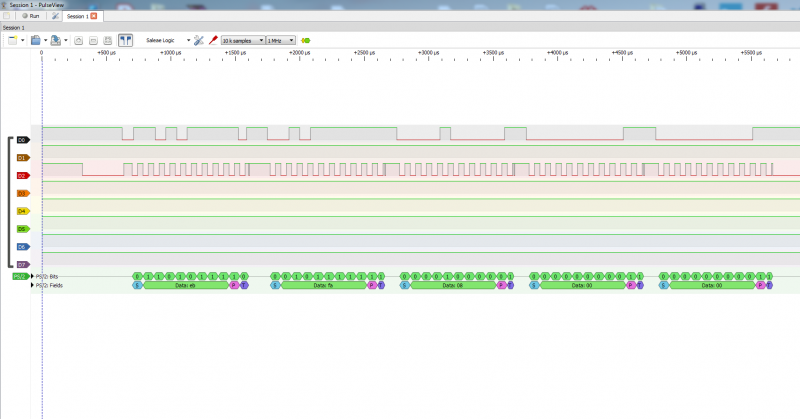
Логическим анализатором я снял дамп работы с тачпадом во время "покоя", то есть пальцем его не трогать. Отчетливо видно что передается 5 пакетов, но во всех примерах считывание идет только 3 раза. Для тестов а подключал большой тачпад (правый верхний), он так же имеет кнопку. Кнопка подключена к контроллеру но ее нажатие никак не передается....
Пишу в Ардуино IDE, Скетч использовал этот:
В сети нашел пример работы с тачпадом и считывания "зоны скролла", скетч практически идентичный, за исключением того что в функции инициализации татча чуть больше команд, а в основном цикле программы чтение с тачпада идет 4 раза.
Но не работает! Если в основном цикле программы чтение данных идет более 3-х раз то Ардуино зависает. Если убрать строчку
mz = mouse_read();
То код работает, но считывает только перемещения.
Может вы можете что-то посоветовать? Может есть готовое решение или библиотеки, которые реализуют получение не только перемещения но и места прикосновения?
То есть не зависимо от положения мыши, не зависимо от положения пальца на тачпаде, передается только направление движения пальца-мыши, и с какой скоростью идет это движение.
В то же время тачпады имеют разметку функциональных кнопок и скролов. На фото ниже видно как тачпад от Тошибы имеет такую разметку.
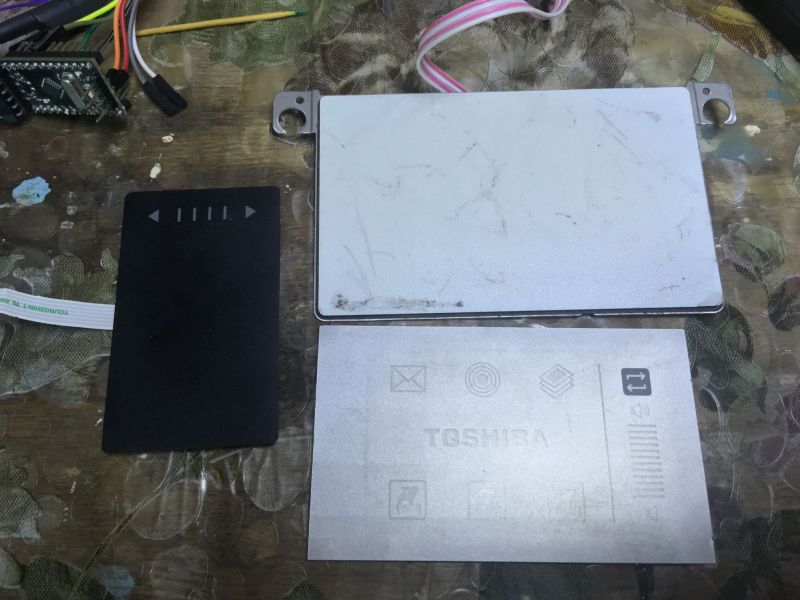

Это подразумевает что контроллеры Synaptics имеют возможность отслеживания не только направление и скорость перемещения, но и точное место прикосновения пальца к тачпаду. То есть, можно на тачпад нанести разметку собственных кнопок и сделать сенсорную клавиатуру... Но ни одна библиотека или пример не дают такой возможности. Только направление и скорость перемещения. Вот ссылка на архив с несколькими библиотеками:
https://drive.google.com/file/d/1SO5TpS ... sp=sharing
Логическим анализатором я снял дамп работы с тачпадом во время "покоя", то есть пальцем его не трогать. Отчетливо видно что передается 5 пакетов, но во всех примерах считывание идет только 3 раза. Для тестов а подключал большой тачпад (правый верхний), он так же имеет кнопку. Кнопка подключена к контроллеру но ее нажатие никак не передается....
Пишу в Ардуино IDE, Скетч использовал этот:
Спойлер
- Код:
/*
 * an arduino sketch to interface with a ps/2 mouse.
 * Also uses serial protocol to talk back to the host
 * and report what it finds.
 */

/*
 * Pin 5 is the mouse data pin, pin 6 is the clock pin
 * Feel free to use whatever pins are convenient.
 */
#define MDATA 5
#define MCLK 6

/*
 * according to some code I saw, these functions will
 * correctly set the mouse clock and data pins for
 * various conditions.
 */
void gohi(int pin)
{
    pinMode(pin, INPUT);
    digitalWrite(pin, HIGH);
}

void golo(int pin)
{
    pinMode(pin, OUTPUT);
    digitalWrite(pin, LOW);
}

void mouse_write(char data)
{
    char i;
    char parity = 1;

    //  Serial.print("Sending ");
    //  Serial.print(data, HEX);
    //  Serial.print(" to mouse\n");
    //  Serial.print("RTS");
    /* put pins in output mode */
    gohi(MDATA);
    gohi(MCLK);
    delayMicroseconds(300);
    golo(MCLK);
    delayMicroseconds(300);
    golo(MDATA);
    delayMicroseconds(10);

    gohi(MCLK);                                     /* start bit */

    while (digitalRead(MCLK) == HIGH);              /* wait for mouse to take control of clock); */

    for (i=0; i < 8; i++) {                         /* clock is low, and we are clear to send data */
        if (data & 0x01) {
            gohi(MDATA);
        }else{
            golo(MDATA);
        }

        while (digitalRead(MCLK) == LOW);           /* wait for clock cycle */
        while (digitalRead(MCLK) == HIGH);
        parity = parity ^ (data & 0x01);
        data = data >> 1;
    }

    if (parity) {                                   /* parity */
        gohi(MDATA);
    }else{
        golo(MDATA);
    }
    while (digitalRead(MCLK) == LOW);
    while (digitalRead(MCLK) == HIGH);

    gohi(MDATA);                                    /* stop bit */
    delayMicroseconds(50);
    while (digitalRead(MCLK) == HIGH);

    while ((digitalRead(MCLK) == LOW) || (digitalRead(MDATA) == LOW));  /* wait for mouse to switch modes */

    golo(MCLK);                                     /* put a hold on the incoming data. */
    //  Serial.print("done.\n");
}

/*
 * Get a byte of data from the mouse
 */
char mouse_read(void){
    char data = 0x00;
    int i;
    char bit = 0x01;

    //  Serial.print("reading byte from mouse\n");
    /* start the clock */
    gohi(MCLK);
    gohi(MDATA);
    delayMicroseconds(50);
    while (digitalRead(MCLK) == HIGH);
    delayMicroseconds(5);  /* not sure why */
    while (digitalRead(MCLK) == LOW) /* eat start bit */;
    for (i=0; i < 8; i++) {
        while (digitalRead(MCLK) == HIGH);
        if (digitalRead(MDATA) == HIGH){
            data = data | bit;
        }
        while (digitalRead(MCLK) == LOW);
        bit = bit << 1;
    }
    /* eat parity bit, which we ignore */
    while (digitalRead(MCLK) == HIGH);
    while (digitalRead(MCLK) == LOW);
    /* eat stop bit */
    while (digitalRead(MCLK) == HIGH);
    while (digitalRead(MCLK) == LOW);

    /* put a hold on the incoming data. */
    golo(MCLK);
    //  Serial.print("Recvd data ");
    //  Serial.print(data, HEX);
    //  Serial.print(" from mouse\n");
    return data;
}

void mouse_init()
{
    gohi(MCLK);
    gohi(MDATA);
    //  Serial.print("Sending reset to mouse\n");
    mouse_write(0xff);
    mouse_read();                                        /* ack byte */
    //  Serial.print("Read ack byte1\n");
    mouse_read();  /* blank */
    mouse_read();  /* blank */
    //mouse_read();  /* blank */
    //mouse_read();  /* blank */
    //  Serial.print("Sending remote mode code\n");
    mouse_write(0xf0);  /* remote mode */
    mouse_read();  /* ack */
    //  Serial.print("Read ack byte2\n");
    delayMicroseconds(100);
}

void setup()
{
    Serial.begin(9600);
    mouse_init();
}

/*
 * get a reading from the mouse and report it back to the
 * host via the serial line.
 */
void loop(){
    char mstat;
    char mx;
    char my;

    /* get a reading from the mouse */
    mouse_write(0xeb);  /* give me data! */
    mouse_read();      /* ignore ack */
    mstat = mouse_read();
    mx = mouse_read();
    my = mouse_read();

    /* send the data back up */
    Serial.print(mstat, BIN);
    Serial.print("\tX=");
    Serial.print(mx, DEC);
    Serial.print("\tY=");
    Serial.print(my, DEC);
    Serial.println();
    delay(20);  /* twiddle */
}
В сети нашел пример работы с тачпадом и считывания "зоны скролла", скетч практически идентичный, за исключением того что в функции инициализации татча чуть больше команд, а в основном цикле программы чтение с тачпада идет 4 раза.
Спойлер
- Код:
/* Modified mouse initialization to accomondate for
 * Intellimouse vertical wheel (scroll)
 * by DGar 02/05/2014
 */

/*
 * an arduino sketch to interface with a ps/2 mouse.
 * Also uses serial protocol to talk back to the host
 * and report what it finds.
 */

/*
 * Pin 5 is the mouse data pin, pin 6 is the clock pin
 * Feel free to use whatever pins are convenient.
 */
#define MDATA 5
#define MCLK 6

/*
 * according to some code I saw, these functions will
 * correctly set the mouse clock and data pins for
 * various conditions.
 */
void gohi(int pin)
{
    pinMode(pin, INPUT);
    digitalWrite(pin, HIGH);
}

void golo(int pin)
{
    pinMode(pin, OUTPUT);
    digitalWrite(pin, LOW);
}

void mouse_write(char data)
{
    char i;
    char parity = 1;

    //  Serial.print("Sending ");
    //  Serial.print(data, HEX);
    //  Serial.print(" to mouse\n");
    //  Serial.print("RTS");

    gohi(MDATA);                                /* put pins in output mode */
    gohi(MCLK);
    delayMicroseconds(300);
    golo(MCLK);
    delayMicroseconds(300);
    golo(MDATA);
    delayMicroseconds(10);

    gohi(MCLK);                                 /* start bit */

    while (digitalRead(MCLK) == HIGH);          /* wait for mouse to take control of clock); */

    for (i=0; i < 8; i++) {                     /* clock is low, and we are clear to send data */
        if (data & 0x01) {
            gohi(MDATA);
        }else{
            golo(MDATA);
        }

        while (digitalRead(MCLK) == LOW);           /* wait for clock cycle */
        while (digitalRead(MCLK) == HIGH);
        parity = parity ^ (data & 0x01);
        data = data >> 1;
    }

    if (parity) {                                   /* parity */
        gohi(MDATA);
    }else{
        golo(MDATA);
    }
    while (digitalRead(MCLK) == LOW);
    while (digitalRead(MCLK) == HIGH);

    gohi(MDATA);                                    /* stop bit */
    delayMicroseconds(50);
    while (digitalRead(MCLK) == HIGH);

    while ((digitalRead(MCLK) == LOW) || (digitalRead(MDATA) == LOW));   /* wait for mouse to switch modes */

    golo(MCLK);                                     /* put a hold on the incoming data. */
    //  Serial.print("done.\n");
}

/*
 * Get a byte of data from the mouse
 */
char mouse_read(void)
{
    char data = 0x00;
    int i;
    char bit = 0x01;

    //  Serial.print("reading byte from mouse\n");
    gohi(MCLK);                                     /* start the clock */
    gohi(MDATA);
    delayMicroseconds(50);
    while (digitalRead(MCLK) == HIGH);
    delayMicroseconds(5);                           /* not sure why */
    while (digitalRead(MCLK) == LOW);                /* eat start bit */
    for (i=0; i < 8; i++) {
        while (digitalRead(MCLK) == HIGH);
        if (digitalRead(MDATA) == HIGH) {
            data = data | bit;
        }
        while (digitalRead(MCLK) == LOW);
        bit = bit << 1;
    }
    while (digitalRead(MCLK) == HIGH);              /* eat parity bit, which we ignore */
    while (digitalRead(MCLK) == LOW);
    while (digitalRead(MCLK) == HIGH);              /* eat stop bit */
    while (digitalRead(MCLK) == LOW);

    golo(MCLK);                                     /* put a hold on the incoming data. */
    //  Serial.print("Recvd data ");
    //  Serial.print(data, HEX);
    //  Serial.print(" from mouse\n");
    return data;
}

void mouse_init(){
    char mouseId;

    gohi(MCLK);
    gohi(MDATA);
    //  Serial.print("Sending reset to mouse\n");
    mouse_write(0xff);
    mouse_read();                                   /* ack byte */
    //  Serial.print("Read ack byte1\n");
    mouse_read();                                   /* blank */
    mouse_read();                                   /* blank */
    //  Serial.print("Setting sample rate 200\n");
    mouse_write(0xf3);                              /* Set rate command */
    mouse_read();                                   /* ack */
    mouse_write(0xC8);                              /* Set rate command */
    mouse_read();                                   /* ack */
    //  Serial.print("Setting sample rate 100\n");
    mouse_write(0xf3);                              /* Set rate command */
    mouse_read();                                   /* ack */
    mouse_write(0x64);                              /* Set rate command */
    mouse_read();                                   /* ack */
    //  Serial.print("Setting sample rate 80\n");
    mouse_write(0xf3);                              /* Set rate command */
    mouse_read();                                   /* ack */
    mouse_write(0x50);                              /* Set rate command */
    mouse_read();                                   /* ack */
    //  Serial.print("Read device type\n");
    mouse_write(0xf2);                              /* Set rate command */
    mouse_read();                                   /* ack */
    mouse_read();                                   /* mouse id, if this value is 0x00 mouse is standard, if it is 0x03 mouse is Intellimouse */
    //  Serial.print("Setting wheel\n");
    mouse_write(0xe8);                              /* Set wheel resolution */
    mouse_read();                                   /* ack */
    mouse_write(0x03);                              /* 8 counts per mm */
    mouse_read();                                   /* ack */
    mouse_write(0xe6);                              /* scaling 1:1 */
    mouse_read();                                   /* ack */
    mouse_write(0xf3);                              /* Set sample rate */
    mouse_read();                                   /* ack */
    mouse_write(0x28);                              /* Set sample rate */
    mouse_read();                                   /* ack */
    mouse_write(0xf4);                              /* Enable device */
    mouse_read();                                   /* ack */

    //  Serial.print("Sending remote mode code\n");
    mouse_write(0xf0);                              /* remote mode */
    mouse_read();                                   /* ack */
    //  Serial.print("Read ack byte2\n");
    delayMicroseconds(100);
}

void setup()
{
    Serial.begin(9600);
    mouse_init();
}

/*
 * get a reading from the mouse and report it back to the
 * host via the serial line.
 */
void loop()
{
    char mstat;
    char mx;
    char my;
    char mz;

    /* get a reading from the mouse */
    mouse_write(0xeb);  /* give me data! */
    mouse_read();      /* ignore ack */
    mstat = mouse_read();
    mx = mouse_read();
    my = mouse_read();
    mz = mouse_read();

    /* send the data back up */
    Serial.print(mstat, BIN);
    Serial.print("\tX=");
    Serial.print(mx, DEC);
    Serial.print("\tY=");
    Serial.print(my, DEC);
    Serial.print("\tZ=");
    Serial.print(mz, DEC);
    Serial.println();
    delay(20);  /* twiddle */
}
Но не работает! Если в основном цикле программы чтение данных идет более 3-х раз то Ардуино зависает. Если убрать строчку
mz = mouse_read();
То код работает, но считывает только перемещения.
Может вы можете что-то посоветовать? Может есть готовое решение или библиотеки, которые реализуют получение не только перемещения но и места прикосновения?
Re: Использование Тачпада от ноутбука
Вс май 23, 2021 22:54:58
раз есть анализатор, то стоит тач подключить к ноуту/компу поставить родные дрова, отсканировать обмен данными и написать прошивку воспроизводящую этот обмен...
Re: Использование Тачпада от ноутбука
Вс май 23, 2021 23:09:02
Думал об этом, но это как костыли. Если не получится по-правильному, то придется так...
Нашел даташит с описанием работы контроллера. Там есть раздел "Absolute mode" - режим, в котором тачпад возвращает координаты нажатия (страница 22).
http://blog.amigas.ru/wp-content/upload ... d_RevB.pdf
Осталось разобраться как прописать необходимый режим работы. Я пока что в этом не разобрался.
Нашел даташит с описанием работы контроллера. Там есть раздел "Absolute mode" - режим, в котором тачпад возвращает координаты нажатия (страница 22).
http://blog.amigas.ru/wp-content/upload ... d_RevB.pdf
Осталось разобраться как прописать необходимый режим работы. Я пока что в этом не разобрался.